Table of Contents
Suppose we want to operate any machine for the first time, suppose an ATM machine. When we insert our card in the machine we don’t get any instructions on the display screen like when to enter amount or pin or account type don’t you think it will become a mess for the users? Interfacing Alphanumeric 16X2 LCD with Arduino will help us in this.
We know everything depends on some information that’s why whenever we design any module we keep in mind it should be a simple interface for the users with proper instruction that’s why we need a display for the users to instruct them what to do and how to process further in appropriate manner.
For that we are using an alphanumeric LCD 16X2 available at a good price as well, which will help us to show some good messages to us and others as well. Let’s continue forward.
INTRODUCTION
LCD (Liquid Crystal Display) screen is an electronic showcase module and locates a wide scope of uses. A 16X2 LCD show is an exceptionally fundamental module and is normally utilized in different gadgets and circuits.
These modules are favored over seven segments and other multi-portion LEDs. The reasons being: LCDs are inexpensive; effectively and simply programmable; able to create and display special and custom characters (like ‘क’ of Hindi or smiley symbol☺).
A 16×2 LCD implies it can show 16 characters for each line and there are 2 such lines. In this LCD each character is shown in a 5×8 pixel grid. Most commonly LCD has two registers, Command register and a Data register.
Command instructions given by the microcontroller will be stored in the command register. Command instruction is a predefined task; it can either be clearing the LCD screen, printing on the screen or setting cursor position etc. The data register stores the information to be shown on the LCD screen. The information is the ASCII value of the character to be shown on the LCD.
PINOUT LCD 16×2
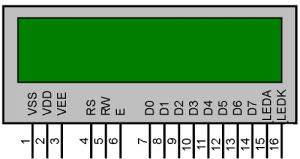
LCD 16x2 Pin Description
| S.No. | Pin Function | Pin Name |
|---|---|---|
| 1. | Ground (0 V) | VSS/Ground |
| 2. | Supply voltage; 5V (4.7V – 5.3V) | VCC |
| 3. | Contrast adjustment; through a variable resistor of 10K ohm. Variable resister is used because in different climatic conditions different value of resistance can make display properly. | VEE |
| 4. | Selects data register when high and command register when low | Register Select – RS |
| 5. | High to read from the register, Low to write to the register | Read/write – RW |
| 6. | Sends data to data pins when a high to low pulse is given | Enable – E |
| 7. | Data Pin (1-Bit) | D0 |
| 8. | Data Pin (1-Bit) | D1 |
| 9. | Data Pin (1-Bit) | D2 |
| 10. | Data Pin (1-Bit) | D3 |
| 11. | Data Pin (1-Bit) | D4 |
| 12. | Data Pin (1-Bit) | D5 |
| 13. | Data Pin (1-Bit) | D6 |
| 14. | Data Pin (1-Bit) | D7 |
| 15. | Backlight VCC (5V) (Anode) | Led + |
| 16. | Backlight Ground (0V) (Cathode) | Led – |
STARTING WITH LCD
Before starting any program we need to use two lines in any code of LCD those are:
(1)  #include<LiquidCrystal.h>
(2) LiquidCrystal lcd(2, 3, 4, 5, 6, 7); // lcd(RS, E, D4, D5, D6, D7)
- First line is to include the Liquid Crystal library,
- Next, declare an object lcd (choose name according to your convenience) of LiquidCrystal library to access functions/methods of the library “LiquidCrystal”.
After that define LCD pins connection to arduino in an order: lcd(RS, E, D4, D5, D6, D7) according to the line (2) we are connecting RS pin of LCD to pin 2 of Arduino (we can change pins according to our convenience but the order remains same for pin RS, E, D4, D5, D6, D7 for example lcd(8, 9, 10, 11, 12, 13) this indicates connect RS pin of LCD to pin 8 of Arduino and enable to 9 of Arduino and so on). Check table and diagram for connections –

These connections are not complete connections, these are only which we defined in our program for data transmission. Other used for power and ground, for complete connection diagram click here
Arduino LCD Connection
| S.No. | LCD | Arduino |
|---|---|---|
| 1. | RS – Register Select | 2 |
| 2. | E – Enable | 3 |
| 3. | D4 – Data pin 4 | 4 |
| 4. | D5 – Data pin 5 | 5 |
| 5. | D6 – Data pin 6 | 6 |
| 6. | D7 – Data pin 7 | 7 |
Some of the Inbuilt Functions of Liquid Crystal Library are
| LiquidCrystal object(RS, E, D4, D5, D6, D7) | createChar( ) | noBlink( ) | autoscroll( ) |
| begin( ) | write( ) | display( ) | noAutoscroll( ) |
| clear( ) | cursor( ) | noDisplay( ) | leftToRight( ) |
| print( ) | noCursor( ) | scrollDisplayLeft( ) | rightToLeft( ) |
| setCursor( ) | blink( ) | scrollDisplayRight( ) | home( ) |
Interfacing of Alphanumeric 16×2 LCD with Arduino
READ NEXT
LCD BEGIN AND SET CURSOR POSITION OF LCD 16×2 USING ARDUINO
Interfacing of Alphanumeric 16×2 LCD with Arduino